


I have been in love with the idea of owning a Primitive style wooden settle for as long as I can remember. This post will describe how to make a Primitive settle using two old doors and a headboard.
I decided that our ‘keeping room’ would be the perfect location for this addition to our home. We use this room for cooking in winter time so it is an extension of our kitchen. Also, we have five dogs. In both instances a fabric sofa would be impractical. Indeed, we did originally have a leather sofa in this room which we brought over from England, but two of our dogs were puppies at the time and literally ate most of it!
I have been asking Jeff to replace the seating with a DIY Primitive inspired wooden settle for some time now. This is in order that we can enjoy our cosy wood burner, and not need to worry about the animals. In the end, this turned out to be a very easy and inexpensive project.
What you will need to make a Primitive wooden settle
First of all decide what materials you are going to use. We used two old doors from our barn. I liked these because of their aged and rustic appearance, but any solid wooden doors will do (do not use hollow doors). We were dismantling the barn to replace it with an eco-house, so this was a useful way to re-purpose the doors.
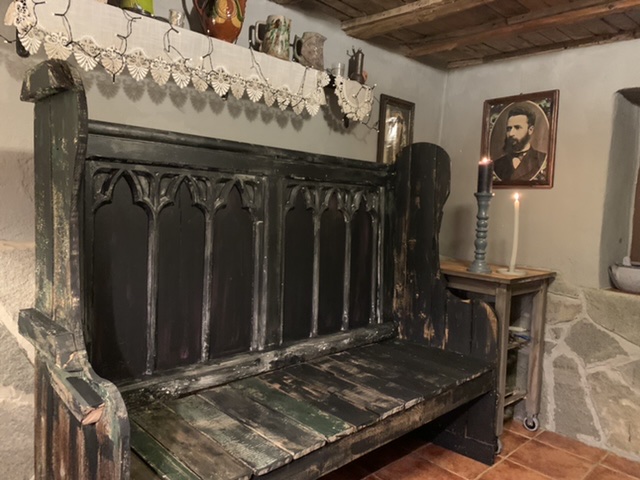
For the back of our settle we used an old headboard which had originally belonged to a church pew. You can use anything you like for the back, but a headboard is a good choice because it’s pre-carved and you can get a nice ornate design if that’s what you are looking for.
You will also need some 100mm and some 50mm screws, a screwdriver, an electric jig saw, a hand saw, and probably some wood worm treatment if you are using reclaimed wood.
For the actual seat supports we used 100mm by 50mm sawn timber and some offcuts from the doors to make the slats for the seat.

Deciding on the hight and width of the settle
Now you need to work out the finished height you want the overall settle to be. The two Wooden sidepieces will need to be cut to this height. To determine the finished height, add the height of the headboard (or whatever you are using for the back of the settle) to the height you want the seat to be from the ground. Also, bear in mind when calculating the hight of the seat that if you are adding a seat cushion then you also need to take this into account. So, in our case, we worked on 450mm for the hight of the seat and an extra 100mm for the cushion. Our headboard was 900mm tall, and we added an extra 100mm to bring the sides a little higher than this.
The overall height of the side pieces came out at 1.45m ( 450mm seat + 100mm cushion + 900mm back + 100mm for curved top = 1.45m).
We decided on a width of 600mm for the side panels, but you can use what width suits your situation.

Deciding on the shape of the side pieces for the Primitive settle
Having studied a number of images of wooden settles on Pinterest, I knew how I wanted ours to look. I wanted the curved arm rests on our settle to be higher than the actual seat. I thought that this was a very cosy ‘look’ to cuddle up with a warm blanket. Therefore, when drawing the design onto the wood, we allowed the curve of the arm rest to come 300mm above the height that we wanted the seat to be. (You can see the finished shape from the photographs)

Next, Jeff took the old doors and laid them flat. Then he marked out the shape we wanted for the side panels free hand. He then used an electric jig saw to cut out the shape . He then used the first panel as a template for the second one in order that they were identical. If your doors have a design or feature on one side, as ours did, then reverse the second door in order that the design is on the outside of both panels when assembled.
Because we used barn doors made from planks for our settle, Jeff had to put a couple of additional timber battens on to the side panels to strengthen them. Then he sanded down any rough edges. he also removed some loose paint.
Assembling the settle
The next step is to attach the side panels to the back. Jeff did this with 100mm screws, 4 on each side. To do this he laid the back panel flat on the floor and lined up the side panels to the back board.
At this point the settle will stand up independently. Jeff was then able to attach the seat supports. For this he cut two pieces from the length of 100 x 50 mm sawn timber- each one the same depth as the seat.
Jeff marked a line 450 mm from the bottom of the side panels where we wished to position the seat. He then attached the support timbers, ensuring that the tops of these were level with this 450mm marking. Jeff used 3 No 100mm screws to fix each end of the seat supports.
We were fortunate in that the headboard had a ledge running across it that we used to position the planks we were going to use for the seat. If your back piece doesn’t have this, then you will also need to add an additional seat support. Make this from the same timber as the side bearers. Cut it to the width of your seat and screw in place.
You will also need a piece of timber to make a support for the front of your seat. See the video below on how to make a Primitive settle.
To make the actual seat: jeff cut some boards from off cuts from the barn doors. Ours were 51 cm in length and about 12 cm wide. These were then placed on top of the supports and screwed down into them with 50mm screws.
Final touches
Because all the timber was old we treated the whole of the settle with wood worm treatment.
You can either then paint the wooden settle to a colour of your choice or leave it natural.
The final stage is to add cushions of your choice.

These are a few more photos of our own DIY wooden settle.


How to make a Primitive settle
[…] re-purpose as much as possible from the original structure, we used these two old doors to make a traditional style high back settle for our living […]
Wow this is so unique and beautiful! Incredible!
Thank you 🤣
This is such a neat project. I’m going to pay more attention to salavaged wood pieces in the future, in hopes of finding a nice one to use for a project like this.
Thank you!